# Microservices using ASP.NET Core, Ocelot, MongoDB and JWT
Author:Akram El Assas /29 Jun 2020 /MIT
Abstract
Microservices sample architecture using ASP.NET Core, Ocelot, MongoDB and JWT.
This article shows a working sample of microservices architecture using ASP.NET Core, Ocelot, MongoDB and JWT. This article covers how to create microservices using ASP.NET Core, how to create API gateways using Ocelot, how to create repositories using MongoDB, how to handle JWT in microservices, how to unit test microservices using xUnit and Moq, how to monitor microservices using health checks, and finally how to deploy microservices using Docker containers on Linux distributions.
Table of Contents
Introduction
Development Environment
Technologies
Architecture
Source Code
    Microservices
    API Gateways
    Client Apps
Unit Tests
Monitoring using Health Checks
How to Run the Application
How to Deploy the Application
References
History
Introduction

A microservices architecture consists of a collection of small, independent, and loosely coupled services. Each service is self-contained, implements a single business capability, is responsible for persisting its own data, is a separate codebase, and can be deployed independently.
API gateways are entry points for clients. Instead of calling services directly, clients call the API gateway, which forwards the call to the appropriate services.
There are multiple advantages using microservices architecture:
- Developers can better understand the functionality of a service.
- Failure in one service does not impact other services.
- It's easier to manage bug fixes and feature releases.
- Services can be deployed in multiple servers to enhance performance.
- Services are easy to change and test.
- Services are easy and fast to deploy.
- Allows to choose technology that is suited for a particular functionality.
Before choosing microservices architecture, here are some challenges to consider:
- Services are simple but the entire system as a whole is more complex.
- Communication between services can be complex.
- More services equals more resources.
- Global testing can be difficult.
- Debugging can be harder.
Microservices architecture is great for large companies, but can be complicated for small companies who need to create and iterate quickly, and don't want to get into complex orchestration.
This article shows a working sample of microservices architecture using ASP.NET Core, Ocelot, MongoDB and JWT.
This article covers how to create microservices using ASP.NET Core, how to create API gateways using Ocelot, how to create repositories using MongoDB, how to handle JWT in microservices, how to unit test microservices using xUnit and Moq, how to monitor microservices using health checks, and finally how to deploy microservices using Docker containers on Linux distributions.
Microservices and gateways are developed using ASP.NET Core and C#. Client apps are developed using HTML and JavaScript for sake of simplicity.
Development Environment
- Visual Studio 2019
- .NET Core 3.1
- MongoDB
- Postman
Technologies
- C#
- ASP.NET Core
- Ocelot
- Swashbuckle
- Serilog
- JWT
- MongoDB
- xUnit
- Moq
- HTML
- CSS
- JavaScript
Architecture
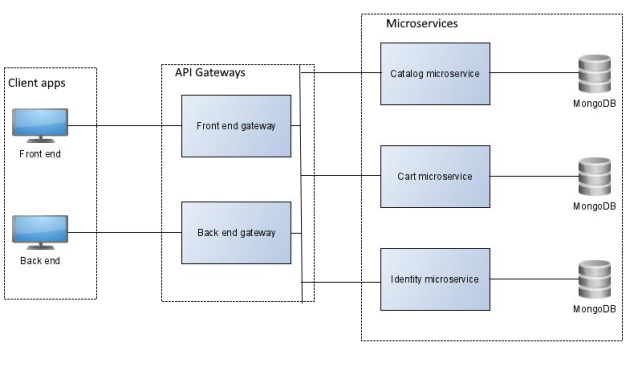
There are three microservices:
- Catalog microservice: allows to manage the catalog.
- Cart microservice: allows to manage the cart.
- Identity microservice: allows to manage users.
Each microservice implements a single business capability and has its own MongoDB database.
There are two API gateways, one for the front end and one for the back end.
Below is the front end API gateway:
- GET /catalog: retrieves catalog items.
- GET /catalog/{id}: retrieves a catalog item.
- GET /cart: retrieves cart items.
- POST /cart: adds a cart item.
- PUT /cart: updates a cart item.
- DELETE /cart: deletes a cart item.
- POST /identity/login: performs a login.
- POST /identity/register: registers a user.
- GET /identity/validate: validates a JWT token.
Below is the back end API gateway:
- GET /catalog: retrieves catalog items.
- GET /catalog/{id}: retrieves a catalog item.
- POST /catalog: creates a catalog item.
- PUT /catalog: updates a catalog item.
- DELETE /catalog/{id}: deletes a catalog item.
- POST /identity/login: performs a login.
- GET /identity/validate: validates a JWT token.
Finally, there are two client apps. A front end for accessing the store and a back end for managing the store.
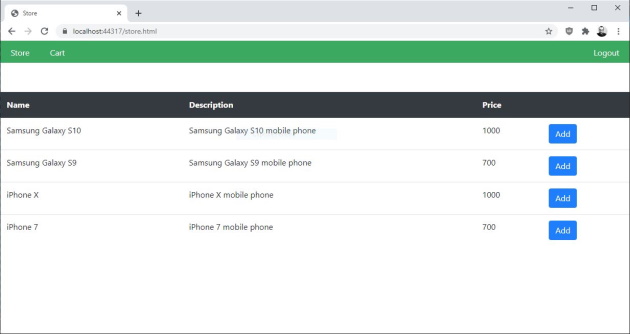
The front end allows registered users to see the available catalog items, allows to add catalog items to the cart, and allows to remove catalog items from the cart.
Here is a screenshot of the store page in the front end:

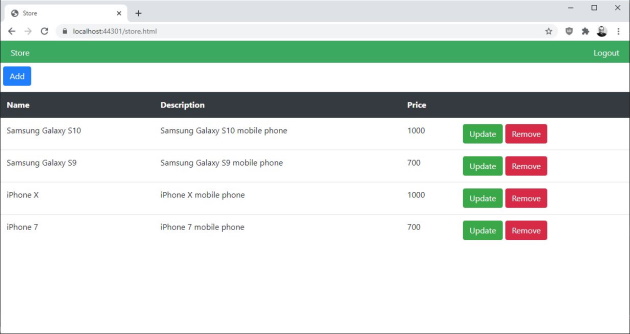
The back end allows admin users to see the available catalog items, allows to add new catalog items, allows to update catalog items, and allows to remove catalog items.
Here is a screenshot of the store page in the back end:

Source Code
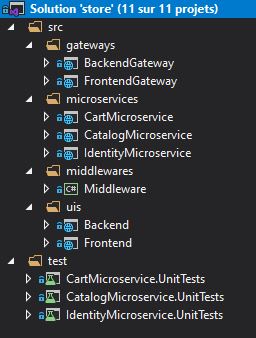
CatalogMicroserviceproject contains the source code of the microservice managing the catalog.CartMicroserviceproject contains the source code of the microservice managing the cart.IdentityMicroserviceproject contains the source code of the microservice managing users.Middlewareproject contains the source code of common functionalities used by microservices.FrontendGatewayproject contains the source code of the front end API gateway.BackendGatewayproject contains the source code of the back end API gateway.Frontendproject contains the source code of the front end client app.Backendproject contains the source code of the back end client app.testsolution folder contains unit tests of all microservices.
You can also find the source code on GitHub.
Microservices
Let's start with the simplest microservice, CatalogMicroservice.
CatalogMicroservice is responsible of managing the catalog.
Below is the model used by CatalogMicroservice:
public class CatalogItem
{
    public static readonly string DocumentName = "catalogItems";

    public Guid Id { get; set; }
    public string Name { get; set; }
    public string Description { get; set; }
    public decimal Price { get; set; }
}
Below is the repository interface:
public interface ICatalogRepository
{
    List<CatalogItem> GetCatalogItems();
    CatalogItem GetCatalogItem(Guid catalogItemId);
    void InsertCatalogItem(CatalogItem catalogItem);
    void UpdateCatalogItem(CatalogItem catalogItem);
    void DeleteCatalogItem(Guid catalogItemId);
}
Below is the repository:
public class CatalogRepository : ICatalogRepository
{
    private readonly IMongoCollection<CatalogItem> _col;

    public CatalogRepository(IMongoDatabase db)
    {
        _col = db.GetCollection<CatalogItem>(CatalogItem.DocumentName);
    }

    public List<CatalogItem> GetCatalogItems() =>
        _col.Find(FilterDefinition<CatalogItem>.Empty).ToList();

    public CatalogItem GetCatalogItem(Guid catalogItemId) =>
        _col.Find(c => c.Id == catalogItemId).FirstOrDefault();

    public void InsertCatalogItem(CatalogItem catalogItem) =>
        _col.InsertOne(catalogItem);

    public void UpdateCatalogItem(CatalogItem catalogItem) =>
        _col.UpdateOne(c => c.Id == catalogItem.Id, Builders<CatalogItem>.Update
            .Set(c => c.Name, catalogItem.Name)
            .Set(c => c.Description, catalogItem.Description)
            .Set(c => c.Price, catalogItem.Price));

    public void DeleteCatalogItem(Guid catalogItemId) =>
        _col.DeleteOne(c => c.Id == catalogItemId);
}
Below is the controller:
[Route("api/[controller]")]
[ApiController]
public class CatalogController : ControllerBase
{
    private readonly ICatalogRepository _catalogRepository;

    public CatalogController(ICatalogRepository catalogRepository)
    {
        _catalogRepository = catalogRepository;
    }

    // GET: api/<CatalogController>
    [HttpGet]
    public ActionResult<IEnumerable<CatalogItem>> Get()
    {
        var catalogItems = _catalogRepository.GetCatalogItems();
        return Ok(catalogItems);
    }

    // GET api/<CatalogController>/110ec627-2f05-4a7e-9a95-7a91e8005da8
    [HttpGet("{id}")]
    public ActionResult<CatalogItem> Get(Guid id)
    {
        var catalogItem = _catalogRepository.GetCatalogItem(id);
        return Ok(catalogItem);
    }

    // POST api/<CatalogController>
    [HttpPost]
    public ActionResult Post([FromBody] CatalogItem catalogItem)
    {
        _catalogRepository.InsertCatalogItem(catalogItem);
        return CreatedAtAction(nameof(Get), new { id = catalogItem.Id }, catalogItem);
    }

    // PUT api/<CatalogController>
    [HttpPut]
    public ActionResult Put([FromBody] CatalogItem catalogItem)
    {
        if (catalogItem != null)
        {
            _catalogRepository.UpdateCatalogItem(catalogItem);
            return new OkResult();
        }
        return new NoContentResult();
    }

    // DELETE api/<CatalogController>/110ec627-2f05-4a7e-9a95-7a91e8005da8
    [HttpDelete("{id}")]
    public ActionResult Delete(Guid id)
    {
        _catalogRepository.DeleteCatalogItem(id);
        return new OkResult();
    }
}
ICatalogRepository is added using dependency injection in Startup.cs:
public void ConfigureServices(IServiceCollection services)
{
    services.AddControllers();
    services.AddMongoDb(Configuration);
    services.AddSingleton<ICatalogRepository>(sp => new CatalogRepository(sp.GetService<IMongoDatabase>()));
    services.AddSwaggerGen(c =>
    {
        c.SwaggerDoc("v1", new OpenApiInfo { Title = "Catalog", Version = "v1" });
    });
}
Below is AddMongoDB extension method:
public static void AddMongoDb(this IServiceCollection services, IConfiguration configuration)
{
    services.Configure<MongoOptions>(configuration.GetSection("mongo"));
    services.AddSingleton(sp =>
    {
        var options = sp.GetService<IOptions<MongoOptions>>();

        return new MongoClient(options.Value.ConnectionString);
    });
    services.AddSingleton(sp =>
    {
        var options = sp.GetService<IOptions<MongoOptions>>();
        var client = sp.GetService<MongoClient>();

        return client.GetDatabase(options.Value.Database);
    });
}
Below is Configure method in Startup.cs:
public void Configure(IApplicationBuilder app, IWebHostEnvironment env)
{
    if (env.IsDevelopment())
    {
        app.UseDeveloperExceptionPage();
    }

    app.UseSwagger();

    app.UseSwaggerUI(c =>
    {
        c.SwaggerEndpoint("/swagger/v1/swagger.json", "Catalog V1");
    });

    app.UseRouting();

    app.UseAuthorization();

    app.UseEndpoints(endpoints =>
    {
        endpoints.MapControllers();
    });
}
Below is appsettings.json:
{
  "Logging": {
    "LogLevel": {
      "Default": "Information",
      "Microsoft": "Warning",
      "Microsoft.Hosting.Lifetime": "Information"
    }
  },
  "AllowedHosts": "*",
  "mongo": {
    "connectionString": "mongodb://localhost:27017",
    "database": "catalog"
  }
}
Now, let's test CatalogMicroservice.
Open Postman and execute the following POST request http://localhost:44326/api/catalog with the following payload to create a new catalog item:
{
  "name": "Samsung Galaxy S10",
  "description": "Samsung Galaxy S10 mobile phone",
  "price": 1000
}

Then, execute the following GET request http://localhost:44326/api/catalog to retrieve the catalog:

We can see that CatalogMicroservice is working fine. PUT and DELETE requests can be tested in the same way.
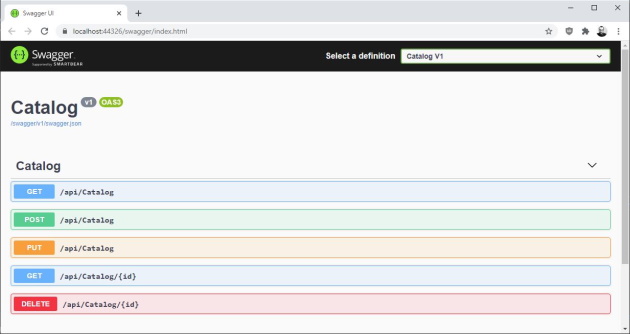
API documentation is generated using Swashbuckle. Swagger middleware is configured in Startup.cs, inConfigureServices and Configure methods in Startup.cs.
If you run CatalogMicroservice project using IISExpress or Docker, you will get the Swagger UI:
CartMicroservice is done pretty much the same way as CatalogMicroservice.
Now, let's move on to IdentityMicroservice.
IdentityMicroservice is responsible for managing users.
Below is the model used by IdentityMicroservice:
public class User
{
    public static readonly string DocumentName = "users";

    public Guid Id { get; set; }
    public string Email { get; set; }
    public string Password { get; set; }
    public string Salt { get; set; }
    public bool IsAdmin { get; set; }

    public void SetPassword(string password, IEncryptor encryptor)
    {
        Salt = encryptor.GetSalt(password);
        Password = encryptor.GetHash(password, Salt);
    }

    public bool ValidatePassword(string password, IEncryptor encryptor)
    {
        var isValid = Password.Equals(encryptor.GetHash(password, Salt));
        return isValid;
    }
}
IEncryptor is used for encrypting passwords.
Below is the repository interface:
public interface IUserRepository
{
    User GetUser(string email);
    void InsertUser(User user);
}
Below is the repository:
public class UserRepository : IUserRepository
{
    private readonly IMongoCollection<User> _col;

    public UserRepository(IMongoDatabase db)
    {
        _col = db.GetCollection<User>(User.DocumentName);
    }

    public User GetUser(string email) =>
        _col.Find(u => u.Email == email).FirstOrDefault();

    public void InsertUser(User user) =>
        _col.InsertOne(user);
}
Below is the controller:
[Route("api/[controller]")]
[ApiController]
public class IdentityController : ControllerBase
{
    private readonly IUserRepository _userRepository;
    private readonly IJwtBuilder _jwtBuilder;
    private readonly IEncryptor _encryptor;

    public IdentityController(IUserRepository userRepository, IJwtBuilder jwtBuilder, IEncryptor encryptor)
    {
        _userRepository = userRepository;
        _jwtBuilder = jwtBuilder;
        _encryptor = encryptor;
    }

    [HttpPost("login")]
    public ActionResult<string> Login([FromBody] User user, [FromQuery(Name = "d")] string destination = "frontend")
    {
        var u = _userRepository.GetUser(user.Email);

        if (u == null)
        {
            return NotFound("User not found.");
        }

        if (destination == "backend" && !u.IsAdmin)
        {
            return BadRequest("Could not authenticate user.");
        }

        var isValid = u.ValidatePassword(user.Password, _encryptor);

        if (!isValid)
        {
            return BadRequest("Could not authenticate user.");
        }

        var token = _jwtBuilder.GetToken(u.Id);

        return Ok(token);
    }

    [HttpPost("register")]
    public ActionResult Register([FromBody] User user)
    {
        var u = _userRepository.GetUser(user.Email);

        if (u != null)
        {
            return BadRequest("User already exists.");
        }

        user.SetPassword(user.Password, _encryptor);
        _userRepository.InsertUser(user);

        return Ok();
    }

    [HttpGet("validate")]
    public ActionResult<Guid> Validate([FromQuery(Name = "email")] string email, [FromQuery(Name = "token")] string token)
    {
        var u = _userRepository.GetUser(email);

        if (u == null)
        {
            return NotFound("User not found.");
        }

        var userId = _jwtBuilder.ValidateToken(token);

        if (userId != u.Id)
        {
            return BadRequest("Invalid token.");
        }

        return Ok(userId);
    }
}
IUserRepository, IJwtBuilder and IEncryptor are added using dependency injection in Startup.cs:
public void ConfigureServices(IServiceCollection services)
{
    services.AddControllers();
    services.AddMongoDb(Configuration);
    services.AddSingleton<IUserRepository>(sp => new UserRepository(sp.GetService<IMongoDatabase>()));
    services.AddJwt(Configuration);
    services.AddTransient<IEncryptor, Encryptor>();
    services.AddSwaggerGen(c =>
    {
        c.SwaggerDoc("v1", new OpenApiInfo { Title = "Identity", Version = "v1" });
    });
}
Below is Configure method in Startup.cs:
public void Configure(IApplicationBuilder app, IWebHostEnvironment env)
{
    if (env.IsDevelopment())
    {
        app.UseDeveloperExceptionPage();
    }

    app.UseSwagger();

    app.UseSwaggerUI(c =>
    {
        c.SwaggerEndpoint("/swagger/v1/swagger.json", "Identity V1");
    });

    app.UseRouting();

    app.UseAuthorization();

    app.UseEndpoints(endpoints =>
    {
        endpoints.MapControllers();
    });
}
Below is AddJwt extension method:
public static void AddJwt(this IServiceCollection services, IConfiguration configuration)
{
    var options = new JwtOptions();
    var section = configuration.GetSection("jwt");
    section.Bind(options);
    services.Configure<JwtOptions>(section);
    services.AddSingleton<IJwtBuilder, JwtBuilder>();
    services.AddAuthentication()
    .AddJwtBearer(cfg =>
    {
        cfg.RequireHttpsMetadata = false;
        cfg.SaveToken = true;
        cfg.TokenValidationParameters = new TokenValidationParameters
        {
            ValidateAudience = false,
            IssuerSigningKey =
               new SymmetricSecurityKey(Encoding.UTF8.GetBytes(options.Secret))
        };
    });
}
IJwtBuilder is responsible for creating JWT tokens and validating them:
public interface IJwtBuilder
{
    string GetToken(Guid userId);
    Guid ValidateToken(string token);
}
Below is the implementation of IJwtBuilder:
public class JwtBuilder : IJwtBuilder
{
    private readonly JwtOptions _options;

    public JwtBuilder(IOptions<JwtOptions> options)
    {
        _options = options.Value;
    }

    public string GetToken(Guid userId)
    {
        var signingKey = new SymmetricSecurityKey(Encoding.UTF8.GetBytes(_options.Secret));
        var signingCredentials =
            new SigningCredentials(signingKey, SecurityAlgorithms.HmacSha256);
        var claims = new Claim[]
        {
            new Claim("userId", userId.ToString()),
        };
        var expirationDate = DateTime.Now.AddMinutes(_options.ExpiryMinutes);
        var jwt = new JwtSecurityToken
          (claims: claims, signingCredentials: signingCredentials, expires: expirationDate);
        var encodedJwt = new JwtSecurityTokenHandler().WriteToken(jwt);

        return encodedJwt;
    }

    public Guid ValidateToken(string token)
    {
        var principal = GetPrincipal(token);
        if (principal == null)
        {
            return Guid.Empty;
        }

        ClaimsIdentity identity;
        try
        {
            identity = (ClaimsIdentity)principal.Identity;
        }
        catch (NullReferenceException)
        {
            return Guid.Empty;
        }
        var userIdClaim = identity.FindFirst("userId");
        var userId = new Guid(userIdClaim.Value);
        return userId;
    }

    private ClaimsPrincipal GetPrincipal(string token)
    {
        try
        {
            var tokenHandler = new JwtSecurityTokenHandler();
            var jwtToken = (JwtSecurityToken)tokenHandler.ReadToken(token);
            if (jwtToken == null)
            {
                return null;
            }
            var key = Encoding.UTF8.GetBytes(_options.Secret);
            var parameters = new TokenValidationParameters()
            {
                RequireExpirationTime = true,
                ValidateIssuer = false,
                ValidateAudience = false,
                IssuerSigningKey = new SymmetricSecurityKey(key)
            };
            IdentityModelEventSource.ShowPII = true;
            SecurityToken securityToken;
            ClaimsPrincipal principal = tokenHandler.ValidateToken(token,
                    parameters, out securityToken);
            return principal;
        }
        catch (Exception)
        {
            return null;
        }
    }
}
IEncryptor is simply responsible for encrypting passwords:
public interface IEncryptor
{
    string GetSalt(string value);
    string GetHash(string value, string salt);
}
Below is the implementation of IEncryptor:
public class Encryptor: IEncryptor
{
    private static readonly int saltSize = 40;
    private static readonly int iterationsCount = 10000;

    public string GetSalt(string value)
    {
        var saltBytes = new byte[saltSize];
        var rng = RandomNumberGenerator.Create();
        rng.GetBytes(saltBytes);

        return Convert.ToBase64String(saltBytes);
    }

    public string GetHash(string value, string salt)
    {
        var pbkdf2 = new Rfc2898DeriveBytes(value, GetBytes(salt), iterationsCount);

        return Convert.ToBase64String(pbkdf2.GetBytes(saltSize));
    }

    private static byte[] GetBytes(string value)
    {
        var bytes = new byte[value.Length * sizeof(char)];
        Buffer.BlockCopy(value.ToCharArray(), 0, bytes, 0, bytes.Length);

        return bytes;
    }
}
Below is appsettings.json:
{
  "Logging": {
    "LogLevel": {
      "Default": "Information",
      "Microsoft": "Warning",
      "Microsoft.Hosting.Lifetime": "Information"
    }
  },
  "AllowedHosts": "*",
  "mongo": {
    "connectionString": "mongodb://localhost:27017",
    "database": "identity"
  },
  "jwt": {
    "secret": "9095a623-a23a-481a-aa0c-e0ad96edc103",
    "expiryMinutes": 60
  }
}
Now, let's test IdentityMicroservice.
Open Postman and execute the following POST request http://localhost:44397/api/identity/register with the following payload to register a user:
{
  "email": "user@store.com",
  "password": "pass"
}

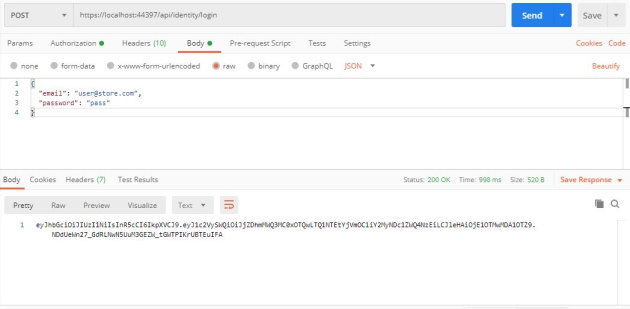
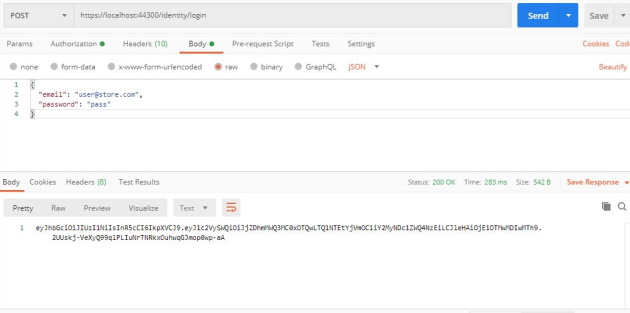
Now, execute the following POST request http://localhost:44397/api/identity/login with the following payload to create a JWT token:
{
  "email": "user@store.com",
  "password": "pass"
}
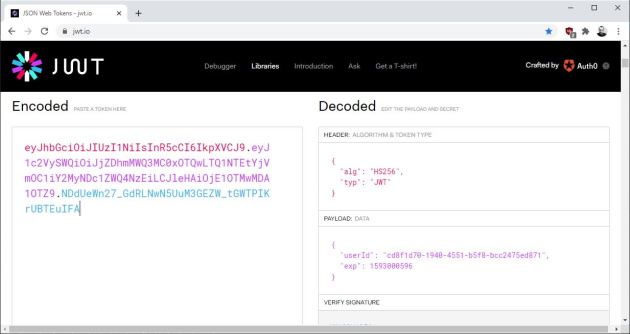
You can then check the generated token on jwt.io:

That's it. You can execute the following GET request http://localhost:44397/api/identity/validate?email={email}&token={token} in the same way to validate a JWT token. If the token is valid, the response will be the user Id which is a Guid.
If you run IdentityMicroservice project using IISExpress or Docker, you will get the Swagger UI:

API Gateways
There are two API gateways, one for the front end and one for the back end.
Let's start with the front end.
configuration.json configuration file was added in Program.cs as follows:
public static IHostBuilder CreateHostBuilder(string[] args) =>
    Host.CreateDefaultBuilder(args)
    .ConfigureAppConfiguration((hostingContext, config) =>
    {
        config
            .SetBasePath(hostingContext.HostingEnvironment.ContentRootPath)
            .AddJsonFile("appsettings.json", true, true)
            .AddJsonFile($"appsettings.{hostingContext.HostingEnvironment.EnvironmentName}.json", true, true)
            .AddJsonFile($"configuration.{hostingContext.HostingEnvironment.EnvironmentName}.json", optional: false, reloadOnChange: true)
            .AddEnvironmentVariables();
    })
    .ConfigureWebHostDefaults(webBuilder =>
    {
        webBuilder
        .UseSerilog((_, config) =>
        {
            config
                .MinimumLevel.Information()
                .MinimumLevel.Override("Microsoft", LogEventLevel.Warning)
                .Enrich.FromLogContext()
                .WriteTo.Console();
        })
        .UseStartup<Startup>();
    });
Serilog is configured to write logs to the console. You can of course write logs to text files using WriteTo.File(@"Logs\store.log") and Serilog.Sinks.File nuget package.
Then, here is Startup.cs:
public class Startup
{
    public Startup(IConfiguration configuration)
    {
        Configuration = configuration;
    }

    public IConfiguration Configuration { get; }

    // This method gets called by the runtime. Use this method to add services to the container.
    public void ConfigureServices(IServiceCollection services)
    {
        services.AddControllers();
        services.AddOcelot(Configuration);

        var jwtSection = Configuration.GetSection("jwt");
        var jwtOptions = jwtSection.Get<JwtOptions>();
        var key = Encoding.UTF8.GetBytes(jwtOptions.Secret);

        services.AddAuthentication(x =>
        {
            x.DefaultAuthenticateScheme = JwtBearerDefaults.AuthenticationScheme;
            x.DefaultChallengeScheme = JwtBearerDefaults.AuthenticationScheme;
        })
        .AddJwtBearer(x =>
        {
            x.RequireHttpsMetadata = false;
            x.SaveToken = true;
            x.TokenValidationParameters = new TokenValidationParameters
            {
                ValidateIssuerSigningKey = true,
                IssuerSigningKey = new SymmetricSecurityKey(key),
                ValidateIssuer = false,
                ValidateAudience = false
            };
        });

        services.AddCors(options =>
        {
            options.AddPolicy("CorsPolicy",
                builder => builder.AllowAnyOrigin()
                    .AllowAnyMethod()
                    .AllowAnyHeader());
        });
    }

    // This method gets called by the runtime. Use this method to configure the HTTP request pipeline.
    public async void Configure(IApplicationBuilder app, IWebHostEnvironment env)
    {
        if (env.IsDevelopment())
        {
            app.UseDeveloperExceptionPage();
        }

        app.UseMiddleware<RequestResponseLoggingMiddleware>();

        app.UseCors("CorsPolicy");

        app.UseAuthentication();
        await app.UseOcelot();
    }
}
Here is RequestResponseLoggingMiddleware.cs:
public class RequestResponseLoggingMiddleware
{
    private readonly ILogger<RequestResponseLoggingMiddleware> _logger;
    private readonly RequestDelegate _next;

    public RequestResponseLoggingMiddleware(RequestDelegate next, ILogger<RequestResponseLoggingMiddleware> logger)
    {
        _next = next;
        _logger = logger;
    }

    public async Task InvokeAsync(HttpContext context)
    {
        context.Request.EnableBuffering();
        var builder = new StringBuilder();
        var request = await FormatRequest(context.Request);
        builder.Append("Request: ").AppendLine(request);
        builder.AppendLine("Request headers:");

        foreach (var header in context.Request.Headers)
        {
            builder.Append(header.Key).Append(": ").AppendLine(header.Value);
        }

        var originalBodyStream = context.Response.Body;
        using var responseBody = new MemoryStream();
        context.Response.Body = responseBody;
        await _next(context);

        var response = await FormatResponse(context.Response);
        builder.Append("Response: ").AppendLine(response);
        builder.AppendLine("Response headers: ");

        foreach (var header in context.Response.Headers)
        {
            builder.Append(header.Key).Append(": ").AppendLine(header.Value);
        }

        _logger.LogInformation(builder.ToString());

        await responseBody.CopyToAsync(originalBodyStream);
    }

    private async Task<string> FormatRequest(HttpRequest request)
    {
        using var reader = new StreamReader(
            request.Body,
            encoding: Encoding.UTF8,
            detectEncodingFromByteOrderMarks: false,
            leaveOpen: true);
        var body = await reader.ReadToEndAsync();
        var formattedRequest = $"{request.Method} {request.Scheme}://{request.Host}{request.Path}{request.QueryString} {body}";
        request.Body.Position = 0;
        return formattedRequest;
    }

    private async Task<string> FormatResponse(HttpResponse response)
    {
        response.Body.Seek(0, SeekOrigin.Begin);
        string text = await new StreamReader(response.Body).ReadToEndAsync();
        response.Body.Seek(0, SeekOrigin.Begin);
        return $"{response.StatusCode}: {text}";
    }
}
We used logging in the gateway so that we don't need to check the logs of each microservice.
Here is configuration.Development.json:
{
  "Routes": [
    {
      "DownstreamPathTemplate": "/api/catalog",
      "DownstreamScheme": "http",
      "DownstreamHostAndPorts": [
        {
          "Host": "localhost",
          "Port": 44326
        }
      ],
      "UpstreamPathTemplate": "/catalog",
      "UpstreamHttpMethod": [ "GET" ],
      "AuthenticationOptions": {
        "AuthenticationProviderKey": "Bearer",
        "AllowedScopes": []
      }
    },
    {
      "DownstreamPathTemplate": "/api/catalog/{id}",
      "DownstreamScheme": "http",
      "DownstreamHostAndPorts": [
        {
          "Host": "localhost",
          "Port": 44326
        }
      ],
      "UpstreamPathTemplate": "/catalog/{id}",
      "UpstreamHttpMethod": [ "GET" ],
      "AuthenticationOptions": {
        "AuthenticationProviderKey": "Bearer",
        "AllowedScopes": []
      }
    },
    {
      "DownstreamPathTemplate": "/api/cart",
      "DownstreamScheme": "http",
      "DownstreamHostAndPorts": [
        {
          "Host": "localhost",
          "Port": 44388
        }
      ],
      "UpstreamPathTemplate": "/cart",
      "UpstreamHttpMethod": [ "GET", "POST", "PUT", "DELETE" ],
      "AuthenticationOptions": {
        "AuthenticationProviderKey": "Bearer",
        "AllowedScopes": []
      }
    },
    {
      "DownstreamPathTemplate": "/api/identity/login",
      "DownstreamScheme": "http",
      "DownstreamHostAndPorts": [
        {
          "Host": "localhost",
          "Port": 44397
        }
      ],
      "UpstreamPathTemplate": "/identity/login",
      "UpstreamHttpMethod": [ "POST" ]
    },
    {
      "DownstreamPathTemplate": "/api/identity/register",
      "DownstreamScheme": "http",
      "DownstreamHostAndPorts": [
        {
          "Host": "localhost",
          "Port": 44397
        }
      ],
      "UpstreamPathTemplate": "/identity/register",
      "UpstreamHttpMethod": [ "POST" ]
    },
    {
      "DownstreamPathTemplate": "/api/identity/validate",
      "DownstreamScheme": "http",
      "DownstreamHostAndPorts": [
        {
          "Host": "localhost",
          "Port": 44397
        }
      ],
      "UpstreamPathTemplate": "/identity/validate",
      "UpstreamHttpMethod": [ "GET" ]
    }
  ],
  "GlobalConfiguration": {
    "BaseUrl": "http://localhost:44300"
  }
}
And finally, below is appsettings.json:
{
  "Logging": {
    "LogLevel": {
      "Default": "Information",
      "Microsoft": "Warning",
      "Microsoft.Hosting.Lifetime": "Information"
    }
  },
  "AllowedHosts": "*",
  "jwt": {
    "secret": "9095a623-a23a-481a-aa0c-e0ad96edc103"
  }
}
Now, let's test the front end gateway.
First, execute the following POST request http//localhost:44300/identity/login with the following payload to create a JWT token:
{
  "email": "user@store.com",
  "password": "pass"
}
We already created that user while testing IdentityMicroservice. If you didn't create that user, you can create one by executing the following POST request http://localhost:44300/identity/register with the same payload above.
Then, go to Authorization tab in Postman, select Bearer Token type and copy paste the JWT token in Token field. Then, execute the following GET request to retrieve the catalog http://localhost:44300/catalog:
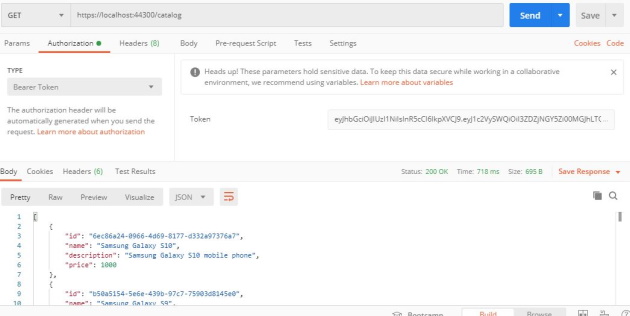
If the JWT token is not valid, the response will be 401 Unauthorized.
You can check tokens on jwt.io:
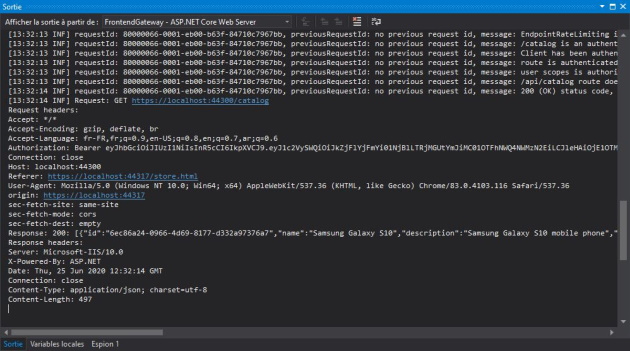
If we open the console in Visual Studio, we get the logs:
That's it. You can test the other API methods in the same way.
The back end gateway is done pretty much the same way. The only difference is in configuration.json file.
Client Apps
There are two client apps. One for the front end and one for the back end.
The client apps are made using HTML and JavaScript for the sake of simplicity.
Let's pick the login page of the front end for example. Here is the HTML:
<!DOCTYPE html>
<html>
<head>
    <meta charset="utf-8" />
    <title>Login</title>
    <link href="css/bootstrap.min.css" rel="stylesheet" />
    <link href="css/login.css" rel="stylesheet" />
</head>
<body>
    <div class="header"></div>
    <div class="login">
        <table>
            <tr>
                <td>Email</td>
                <td><input id="email" type="text" autocomplete="off" class="form-control" /></td>
            </tr>
            <tr>
                <td>Password</td>
                <td><input id="password" type="password" class="form-control" /></td>
            </tr>
            <tr>
                <td></td>
                <td>
                    <input id="login" type="button" value="Login" class="btn btn-primary" />
                    <input id="register" type="button" value="Register" class="btn btn-secondary" />
                </td>
            </tr>
        </table>
    </div>
    <script src="js/settings.js"></script>
    <script src="js/common.js"></script>
    <script src="js/login.js"></script>
</body>
</html>
Here is settings.js:
const settings = {
    uri: "http://" + window.location.hostname + ":44300/"
};
And here is login.js:
window.onload = function () {
    "use strict";

    window.localStorage.removeItem("auth");

    function login() {
        const user = {
            "email": document.getElementById("email").value,
            "password": document.getElementById("password").value
        };
        common.post(settings.uri + "identity/login", function (token) {
            const auth = {
                "email": user.email,
                "token": token
            };
            window.localStorage.setItem("auth", JSON.stringify(auth));
            window.location = "/store.html";
        }, function () {
            alert("Wrong credentials.");
        }, user);
    };

    document.getElementById("login").onclick = function () {
        login();
    };

    document.getElementById("password").onkeyup = function (e) {
        if (e.keyCode === 13) {
            login();
        }
    };

    document.getElementById("register").onclick = function () {
        window.location = "/register.html";
    };
};
common.js contains functions for executing GET, POST and DELETE requests:
const common = {
    post: function (url, callback, errorCallback, content, token) {
        const xmlhttp = new XMLHttpRequest();
        xmlhttp.onreadystatechange = function () {
            if (this.readyState === 4 && this.status >= 200 && this.status < 300 && callback) {
                callback(this.responseText);
            } else if (this.readyState === 4 && errorCallback) {
                errorCallback();
            }
        };
        xmlhttp.onerror = function () {
            if (errorCallback) {
                errorCallback();
            }
        };
        xmlhttp.open("POST", url, true);
        xmlhttp.setRequestHeader("Content-Type", "application/json;charset=UTF-8");
        if (token) {
            xmlhttp.setRequestHeader("Authorization", "Bearer " + token);
        }
        xmlhttp.send(JSON.stringify(content));
    },
    get: function (url, callback, errorCallback, token) {
        const xmlhttp = new XMLHttpRequest();
        xmlhttp.onreadystatechange = function () {
            if (this.readyState === 4 && this.status >= 200 && this.status < 300 && callback) {
                callback(this.responseText);
            } else if (this.readyState === 4 && errorCallback) {
                errorCallback();
            }
        };
        xmlhttp.onerror = function () {
            if (errorCallback) {
                errorCallback();
            }
        };
        xmlhttp.open("GET", url, true);
        if (token) {
            xmlhttp.setRequestHeader("Authorization", "Bearer " + token);
        }
        xmlhttp.send();
    },
    delete: function (url, callback, errorCallback, token) {
        const xmlhttp = new XMLHttpRequest();
        xmlhttp.onreadystatechange = function () {
            if (this.readyState === 4 && this.status >= 200 && this.status < 300 && callback) {
                callback(this.responseText);
            } else if (this.readyState === 4 && errorCallback) {
                errorCallback();
            }
        };
        xmlhttp.onerror = function () {
            if (errorCallback) {
                errorCallback();
            }
        };
        xmlhttp.open("DELETE", url, true);
        if (token) {
            xmlhttp.setRequestHeader("Authorization", "Bearer " + token);
        }
        xmlhttp.send();
    }
};
The other pages in the front end and in the back end are done pretty much the same way.
In the front end, there are four pages. A login page, a page for registering users, a page for accessing the store, and a page for accessing the cart.
The front end allows registered users to see the available catalog items, allows to add catalog items to the cart, and allows to remove catalog items from the cart.
Here is a screenshot of the store page in the front end:
In the back end, there are two pages. A login page and a page for managing the store.
The back end allows admin users to see the available catalog items, allows to add new catalog items, allows to update catalog items, and allows to remove catalog items.
Here is a screenshot of the store page in the back end:
Unit Tests
In this section, we will be unit testing catalog microservice using xUnit and Moq.
When unit testing controller logic, only the contents of a single action are tested, not the behavior of its dependencies or of the framework itself.
xUnit simplifies the testing process and allows us to spend more time focusing on writing our tests.
Moq is a mocking framework for .NET. We will be using it in order to mock repositories and middleware services.
To unit test catalog microservice, first a xUnit testing project CatalogMicroservice.UnitTests was created. Then, a unit testing class CatalogControllerTest was created. This class contains unit testing methods of the catalog controller.
A reference of the project CatalogMicroservice was added to CatalogMicroservice.UnitTests project.
Then, Moq was added using Nuget package manager. At this point we can start focusing on writing ower tests.
A reference of CatalogController was added to CatalogControllerTest:
private readonly CatalogController _controller;
Then, in the constructor of ower unit testing class, a mock repository was added as follows:
public CatalogControllerTest()
{
    var mockRepo = new Mock<ICatalogRepository>();
    mockRepo.Setup(repo => repo.GetCatalogItems()).Returns(_items);
    mockRepo.Setup(repo => repo.GetCatalogItem(It.IsAny<Guid>()))
    .Returns<Guid>(id => _items.FirstOrDefault(i => i.Id == id));
    mockRepo.Setup(repo => repo.InsertCatalogItem(It.IsAny<CatalogItem>()))
    .Callback<CatalogItem>(i => _items.Add(i));
    mockRepo.Setup(repo => repo.UpdateCatalogItem(It.IsAny<CatalogItem>()))
    .Callback<CatalogItem>(i =>
    {
        var item = _items.FirstOrDefault(i => i.Id == i.Id);
        if (item != null)
        {
            item.Name = i.Name;
            item.Description = i.Description;
            item.Price = i.Price;
        }
    });
    mockRepo.Setup(repo => repo.DeleteCatalogItem(It.IsAny<Guid>()))
    .Callback<Guid>(id => _items.RemoveAll(i => i.Id == id));
    _controller = new CatalogController(mockRepo.Object);
}
Where _items is a list of CatalogItem.
Then, here is the test of GET api/catalog:
[Fact]
public void GetCatalogItemsTest()
{
    var okObjectResult = _controller.Get();
    var okResult = Assert.IsType<OkObjectResult>(okObjectResult.Result);
    var items = Assert.IsType<List<CatalogItem>>(okResult.Value);
    Assert.Equal(2, items.Count);
}
Here is the test of GET api/catalog/{id}:
[Fact]
public void GetCatalogItemTest()
{
    var id = new Guid("ce2dbb82-6689-487b-9691-0a05ebabce4a");
    var okObjectResult = _controller.Get(id);
    var okResult = Assert.IsType<OkObjectResult>(okObjectResult.Result);
    var item = Assert.IsType<CatalogItem>(okResult.Value);
    Assert.Equal(id, item.Id);
}
Here is the test of POST api/calatlog:
[Fact]
public void InsertCatalogItemTest()
{
    var createdResponse = _controller.Post(new CatalogItem { Id = new Guid("d378ff93-dc4b-4bf6-8756-58b6901cd47b"), Name = "iPhone X", Description = "iPhone X mobile phone", Price = 1000 });
    var response = Assert.IsType<CreatedAtActionResult>(createdResponse);
    var item = Assert.IsType<CatalogItem>(response.Value);
    Assert.Equal("iPhone X", item.Name);
}
Here is the test of PUT api/catalog:
[Fact]
public void UpdateCatalogItemTest()
{
    var id = new Guid("ce2dbb82-6689-487b-9691-0a05ebabce4a");
    var okObjectResult = _controller.Put(new CatalogItem { Id = id, Name = "Samsung Galaxy S10+", Description = "Samsung Galaxy S10+ mobile phone", Price = 1100 });
    Assert.IsType<OkResult>(okObjectResult);
    var item = _items.First(i => i.Id == id);
    Assert.Equal("Samsung Galaxy S10+", item.Name);
    okObjectResult = _controller.Put(null);
    Assert.IsType<NoContentResult>(okObjectResult);
}
Here is the test of DELETE api/catalog/{id}:
[Fact]
public void DeleteCatalogItemTest()
{
    var id = new Guid("ce2dbb82-6689-487b-9691-0a05ebabce4a");
    var item = _items.FirstOrDefault(i => i.Id == id);
    Assert.NotNull(item);
    var okObjectResult = _controller.Delete(id);
    Assert.IsType<OkResult>(okObjectResult);
    item = _items.FirstOrDefault(i => i.Id == id);
    Assert.Null(item);
}
That's it. Unit tests of cart microservice and identity microservice were written in the same way.
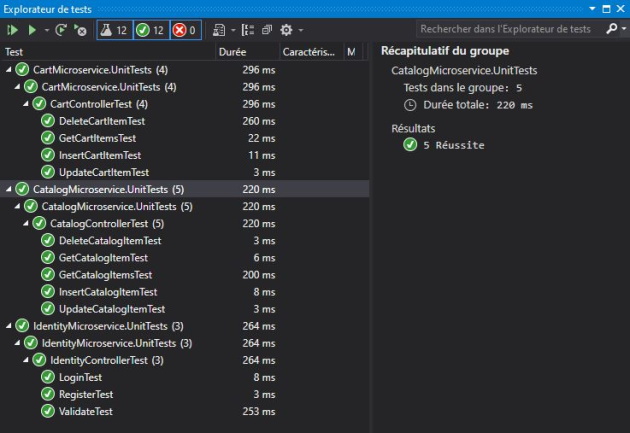
If we run unit tests projects, we will notice that they all pass:
Monitoring using Health Checks
In this section, we will see how to add health checks to catalog microservice for monitoring purposes.
Health checks are endpoints provided by a service to check whether the service is running properly.
Heath checks are used to monitor services such as:
- Database (SQL Server, Oracle, MySql, MongoDB, etc.)
- External API connectivity
- Disk connectivity (read/write)
- Cache service (Redis, Memcached, etc.)
If you don't find an implementation that suits you, you can create your own custom implementation.
To add health checks to catalog microservice, the following nuget packages were added:
- AspNetCore.HealthChecks.MongoDb
- AspNetCore.HealthChecks.UI
- AspNetCore.HealthChecks.UI.Client
- AspNetCore.HealthChecks.UI.InMemory.Storage
AspNetCore.HealthChecks.MongoDb package is used to check the health of MongoDB.
AspNetCore.HealthChecks.UI packages are used to use health check UI that stores and shows the health checks results from the configured HealthChecks uris.
Then, ConfigureServices method in Startup.cs was updated as follows:
services.AddHealthChecks()
    .AddMongoDb(
    mongodbConnectionString: Configuration.GetSection("mongo").Get<MongoOptions>().ConnectionString,
    name: "mongo",
    failureStatus: HealthStatus.Unhealthy
    );
services.AddHealthChecksUI().AddInMemoryStorage();
And Configure method in Startup.cs was updated as follows:
app.UseHealthChecks("/healthz", new HealthCheckOptions()
{
    Predicate = _ => true,
    ResponseWriter = UIResponseWriter.WriteHealthCheckUIResponse
});

app.UseHealthChecksUI();
Finally, appsettings.json was updated as follows:
"HealthChecksUI": {
  "HealthChecks": [
    {
      "Name": "HTTP-Api-Basic",
      "Uri": "http://localhost:44326/healthz"
    }
  ],
  "EvaluationTimeOnSeconds": 10,
  "MinimumSecondsBetweenFailureNotifications": 60
}
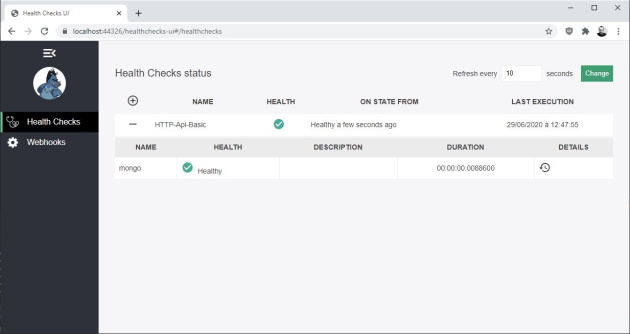
If we run catalog microservice, we will get the following UI when accessing http://localhost:44326/healthchecks-ui:
That's it. Health checks of other microservices and gateways were implemented in the same way.
How to Run the Application
You can run the application using IISExpress in Visual Studio 2019.
You will need to install MongoDB if it is not installed.
First, right click on the solution, click on properties and select multiple startup projects. Select all the projects as startup projects except Middleware project:

Then, press F5 to run the application.
You can access the front end from http://localhost:44317/.
You can access the back end from http://localhost:44301/.
To login to the front end for the first time, just click on Register to create a new user and login.
To login to the back end for the first time, you will need to create an admin user. To do so, open Postman and execute the following POST request http://localhost:44397/api/identity/register with the following payload:
{
  "email": "admin@store.com",
  "password": "pass",
  "isAdmin": true
}
You can also create the admin user using Swagger UI: http://localhost:44397/swagger
Finally, you can login to the back end with the admin user you created.
How to Deploy the Application
You can deploy the application using Docker containers on Linux distributions.
You will need to install Docker and Docker Compose if they are not installed.
First, copy the source code to a folder on your Linux machine.
Then open a terminal, go to that folder (where the .sln file is located) and run the following command:
docker-compose up
That's it, the application will be deployed and will run.
Then, you can access the front end from http://host-ip:44317/ and the back end from http://host-ip:44301/.
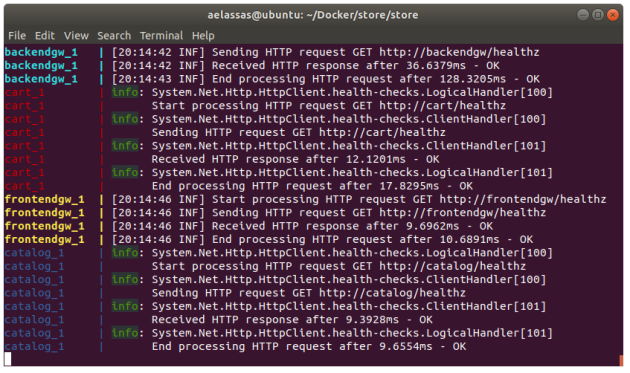
Here is a screenshot of the application running on Ubuntu:
For those who want to understand how the deployment is done, here is docker-compose.yml:
version: "3"
services:
  mongo:
    image: mongo
    ports:
       - 27017:27017

  catalog:
    build:
      context: .
      dockerfile: src/microservices/CatalogMicroservice/Dockerfile
    depends_on:
      - mongo
    ports:
      - 44326:80

  cart:
    build:
      context: .
      dockerfile: src/microservices/CartMicroservice/Dockerfile
    depends_on:
      - mongo
    ports:
      - 44388:80

  identity:
    build:
      context: .
      dockerfile: src/microservices/IdentityMicroservice/Dockerfile
    depends_on:
      - mongo
    ports:
      - 44397:80

  frontendgw:
    build:
      context: .
      dockerfile: src/gateways/FrontendGateway/Dockerfile
    depends_on:
      - mongo
      - catalog
      - cart
      - identity
    ports:
      - 44300:80

  backendgw:
    build:
      context: .
      dockerfile: src/gateways/BackendGateway/Dockerfile
    depends_on:
      - mongo
      - catalog
      - identity
    ports:
      - 44359:80

  frontend:
    build:
      context: .
      dockerfile: src/uis/Frontend/Dockerfile
    ports:
      - 44317:80

  backend:
    build:
      context: .
      dockerfile: src/uis/Backend/Dockerfile
    ports:
      - 44301:80
Then, appsettings.Production.json was used in microservices and gateways, and configuration.Production.json was used in gateways.
For example, here is appsettings.Production.json of catalog microservice:
{
  "Logging": {
    "LogLevel": {
      "Default": "Information",
      "Microsoft": "Warning",
      "Microsoft.Hosting.Lifetime": "Information"
    }
  },
  "AllowedHosts": "*",
  "mongo": {
    "connectionString": "mongodb://mongo",
    "database": "catalog"
  },
  "HealthChecksUI": {
    "HealthChecks": [
      {
        "Name": "HTTP-Api-Basic",
        "Uri": "http://catalog/healthz"
      }
    ],
    "EvaluationTimeOnSeconds": 10,
    "MinimumSecondsBetweenFailureNotifications": 60
  }
}
Here is Dockerfile of catalog microservice:
FROM mcr.microsoft.com/dotnet/core/aspnet:3.1-buster-slim AS base
WORKDIR /app
EXPOSE 80
EXPOSE 443

FROM mcr.microsoft.com/dotnet/core/sdk:3.1-buster AS build
WORKDIR /src
COPY ["src/microservices/CatalogMicroservice/CatalogMicroservice.csproj", "src/microservices/CatalogMicroservice/"]
RUN dotnet restore "src/microservices/CatalogMicroservice/CatalogMicroservice.csproj"
COPY . .
WORKDIR "/src/src/microservices/CatalogMicroservice"
RUN dotnet build "CatalogMicroservice.csproj" -c Release -o /app/build

FROM build AS publish
RUN dotnet publish "CatalogMicroservice.csproj" -c Release -o /app/publish

FROM base AS final
WORKDIR /app
COPY --from=publish /app/publish .
ENTRYPOINT ["dotnet", "CatalogMicroservice.dll"]
Multistage build is explained here. It helps make the process of building containers more efficient, and makes containers smaller by allowing them to contain only the bits that your app needs at run time.
Here is configuration.Production.json of the front end gateway:
{
  "Routes": [
    {
      "DownstreamPathTemplate": "/api/catalog",
      "DownstreamScheme": "http",
      "DownstreamHostAndPorts": [
        {
          "Host": "catalog",
          "Port": 80
        }
      ],
      "UpstreamPathTemplate": "/catalog",
      "UpstreamHttpMethod": [ "GET" ],
      "AuthenticationOptions": {
        "AuthenticationProviderKey": "Bearer",
        "AllowedScopes": []
      }
    },
    {
      "DownstreamPathTemplate": "/api/catalog/{id}",
      "DownstreamScheme": "http",
      "DownstreamHostAndPorts": [
        {
          "Host": "catalog",
          "Port": 80
        }
      ],
      "UpstreamPathTemplate": "/catalog/{id}",
      "UpstreamHttpMethod": [ "GET" ],
      "AuthenticationOptions": {
        "AuthenticationProviderKey": "Bearer",
        "AllowedScopes": []
      }
    },
    {
      "DownstreamPathTemplate": "/api/cart",
      "DownstreamScheme": "http",
      "DownstreamHostAndPorts": [
        {
          "Host": "cart",
          "Port": 80
        }
      ],
      "UpstreamPathTemplate": "/cart",
      "UpstreamHttpMethod": [ "GET", "POST", "PUT", "DELETE" ],
      "AuthenticationOptions": {
        "AuthenticationProviderKey": "Bearer",
        "AllowedScopes": []
      }
    },
    {
      "DownstreamPathTemplate": "/api/identity/login",
      "DownstreamScheme": "http",
      "DownstreamHostAndPorts": [
        {
          "Host": "identity",
          "Port": 80
        }
      ],
      "UpstreamPathTemplate": "/identity/login",
      "UpstreamHttpMethod": [ "POST" ]
    },
    {
      "DownstreamPathTemplate": "/api/identity/register",
      "DownstreamScheme": "http",
      "DownstreamHostAndPorts": [
        {
          "Host": "identity",
          "Port": 80
        }
      ],
      "UpstreamPathTemplate": "/identity/register",
      "UpstreamHttpMethod": [ "POST" ]
    },
    {
      "DownstreamPathTemplate": "/api/identity/validate",
      "DownstreamScheme": "http",
      "DownstreamHostAndPorts": [
        {
          "Host": "identity",
          "Port": 80
        }
      ],
      "UpstreamPathTemplate": "/identity/validate",
      "UpstreamHttpMethod": [ "GET" ]
    }
  ],
  "GlobalConfiguration": {
    "BaseUrl": "http://localhost:44300"
  }
}
Here is appsettings.Production.json of the front end gateway:
{
  "Logging": {
    "LogLevel": {
      "Default": "Information",
      "Microsoft": "Warning",
      "Microsoft.Hosting.Lifetime": "Information"
    }
  },
  "AllowedHosts": "*",
  "jwt": {
    "secret": "9095a623-a23a-481a-aa0c-e0ad96edc103"
  },
  "mongo": {
    "connectionString": "mongodb://mongo"
  },
  "HealthChecksUI": {
    "HealthChecks": [
      {
        "Name": "HTTP-Api-Basic",
        "Uri": "http://frontendgw/healthz"
      }
    ],
    "EvaluationTimeOnSeconds": 10,
    "MinimumSecondsBetweenFailureNotifications": 60
  }
}
And finally, here is Dockerfile of the front end gateway:
FROM mcr.microsoft.com/dotnet/core/aspnet:3.1-buster-slim AS base
WORKDIR /app
EXPOSE 80
EXPOSE 443

FROM mcr.microsoft.com/dotnet/core/sdk:3.1-buster AS build
WORKDIR /src
COPY ["src/gateways/FrontendGateway/FrontendGateway.csproj", "src/gateways/FrontendGateway/"]
RUN dotnet restore "src/gateways/FrontendGateway/FrontendGateway.csproj"
COPY . .
WORKDIR "/src/src/gateways/FrontendGateway"
RUN dotnet build "FrontendGateway.csproj" -c Release -o /app/build

FROM build AS publish
RUN dotnet publish "FrontendGateway.csproj" -c Release -o /app/publish

FROM base AS final
WORKDIR /app
COPY --from=publish /app/publish .
ENTRYPOINT ["dotnet", "FrontendGateway.dll"]
The configurations of other microservices and the back end gateway are done in pretty much the same way.
That's it for the deployment.
That's it. I hope you enjoyed reading this article. If you have any question leave a comment.
References
History
- 21st June, 2020: Initial version
- 24th June, 2020: Added Swagger UI
- 26th June, 2020: Added unit tests
- 29th June, 2020: Added health checks
License
This article, along with any associated source code and files, is licensed under The MIT License
About the Author

 |
Architect | |
|---|---|---|
Morocco  |
Akram graduated from the french engineering school ENSEIRB located in Bordeaux, a city in the south of France, and got his diploma in software engineering in 2010. He worked in France for Mediatvcom, a company specialized in audiovisual, digital television and new technologies. Mediatvcom offers services such as consulting, project management, audit and turnkey solutions adapted to the needs of customers. Akram worked mainly with Microsoft technologies such as C#, ASP.NET and SQL Server but also with JavaScript, jQuery, HTML5 and CSS3. Akram worked on different projects around digital medias such as Media Asset Management systems, Digital Asset Management systems and sometimes on HbbTV apps.
原文参考
URL: Microservices using ASP.NET Core, Ocelot, MongoDB and JWT